(This is hands-down the best moon phase activity I've ever done. In fact, when I first did this - after 10+ years as an astronomy educator - my mind was completely blown. This is one of my top 3 favorite astronomy activities, so I hope you enjoy it.)
If you've ever tried to replicate the phases of the moon, you probably did it the way I used to, by going into a darkened room, turning on a lamp in the middle of the room and then standing around it with a styrofoam ball in your hand. I'm here to tell you there's a better way.
Go outside! Yes, it's that simple. Take your ball on a stick and use the real sun! You see, the phases of the moon are really varying views of the shadow side and the sunny side of the moon as seen from Earth. It's so much easier to do than to explain that I'm just going to tell you how to do the activity and trust that it will all become clear to you. If not, just shoot me an email and I'll be sure to answer any questions you may have.
Here's what to do:
1. If you happen to have a small white styrofoam ball on hand, great! Prop it up on a stick, skewer, pencil or whatever you can find. If you don't, look for something similar. Ping pong balls are white, but a little on the small side. Little Dudestronomer has a small glow-in-the-dark basketball that I use for this purpose, and I just hold it with my hand because he insists I not pop it.
2. Go outside on a sunny day. This activity is most effective if you do it while the moon is out and visible, so check your times and dates and aim for a date/time when you can see the moon during the day.
3. As you hold your ball up in front of you, you can face toward or away from the sun, but the best starting place is off to the side of the sun a bit. As you look at your ball, you'll see that part of it is illuminated by the sun, and part is in shadow. You did it - you demonstrated one phase of the moon!
4. To get the whole cycle, imagine that you're Earth and your ball is the moon. Since the moon orbits Earth, make your ball orbit you - that is to say, spin in a circle with your arm outstretched. As you do, you'll see the phase of your little moon change. In order to get it to look right, you may need to tilt your orbit a bit.
5. If you have the real moon out in the sky, see if you can get your moon to look like the real moon. If it's a first quarter moon, make your moon first quarter. How long does the real moon take to get from first quarter to full? 1 week. From full to third quarter? Another week. From third quarter to new moon? Yet another week. And from new moon back to first quarter? You guessed it, one week.
Here is an actual photograph from the first time I tried this activity with a group of educators through Astronomy From the Ground Up (though I'm not in the frame):
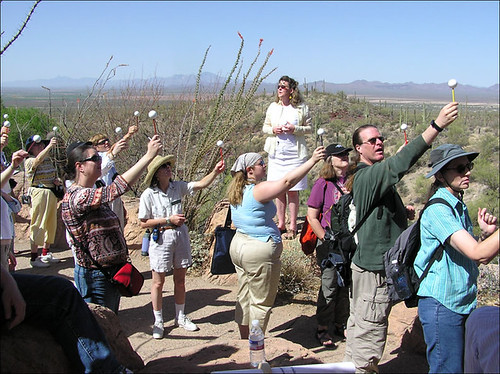
And to see if you're doing it right, your moon and the real moon should look like this (the real moon is to the right of the foam moon):
Sunday, June 28, 2009
Wednesday, June 24, 2009
Kaguya Crashes
I'm a little behind the times on this one, but a couple of weeks ago, the Japanese spacecraft SELENE (nicknamed Kaguya) crashed into the lunar surface. This was a controlled collision that was complete after the orbiter successfully finished its 20-month mission studying the moon.
Kaguya orbited the moon elliptically, so that its oval-shaped path brought it closer and then farther from the lunar surface. Originally at a 100 km - 800 km orbital distance from the surface, it gradually got closer, first to a 50 km circular orbit, and then to a 20 km - 100 km elliptical orbit, eventually crashing into the moon.
The following is an image taken by Kaguya moments before it hit:
Saturday, June 20, 2009
Make Your Own Craters
While we're on the subject of lunar impactors, I feel the need to share a fun crater activity with you. This one is very easy and easily adaptable to just about any age audience. The supplies you will need include:
- a large pan or tub (a pie tin could work, as well as a baking pan, but don't use anything breakable)
- flour
- Nestle Nesquik, instant hot chocolate powder, cocoa powder or any other brown powder you can find
- pebbles, marbles, other spheres of varying sizes and masses
First, you'll put a layer of flour at the bottom of your pan. Make it at least half an inch thick, up to an inch if possible. Smooth out your flour. Next, put a thin layer of chocolate powder over the flour so that none of the chocolate shows. Finally, make your craters!
This is the part that you can adapt very easily. You can choose to use the same size/mass object and drop it into the powder from varying heights (or throw it at varying speeds, but dropping from different heights achieves the same result with better accuracy); or you can see what different objects dropped from the same height do. Try throwing your pebbles onto the tray at an angle.
As the objects impact the powder, the flour will come out from under, simulating the way subsurface materials are brought to the surface during an impact event. In addition, the contrast of the white flour and brown powder make it easy to see the impact sites and details.
There are a million variations on this one out there, but the Night Sky Network has a good one available online as part of a suite of activities for LCROSS; you can get the PDF here.
Friday, June 19, 2009
LCROSS (Finally) Launches
The Lunar Crater Observation and Sensing Satellite launched yesterday, after months of delays and with very little media attention. Originally scheduled to launch in October 2008, this mission will crash a 1,000 kg impactor into the moon at over 9,000 km/hr. Then it will fly through the debris and see what came up. (I love these missions that seem to have been conceived by ten year old boys!) The reason for doing this is to determine if there is any subsurface water on the moon, ostensibly to support any future lunar stations or settlements.
Also launching was the LRO, Lunar Reconnaissance Orbiter. With very high resolution imagers on board, LRO will take detailed 3-D images of the surface of the moon in order to identify possible future landing sites, and will even be on the lookout for any of the leftover Apollo equipment we left on the moon.
I'll keep you updated on further developments, and of course let you know when we start seeing 3-D lunar surface images.
Monday, June 15, 2009
June = Moon
June is going to be full of moon stuff, so here are highlights from Momstronomer:
-the launch of LCROSS (the Lunar Crater Observation and Sensing Satellite) with its companion satellite, LRO (the Lunar Reconnaissance Orbiter)
-the end of Kaguya, the Japanese lunar orbiter
-Not one, but two fun moon activities you can try at home
Stay tuned!
-the launch of LCROSS (the Lunar Crater Observation and Sensing Satellite) with its companion satellite, LRO (the Lunar Reconnaissance Orbiter)
-the end of Kaguya, the Japanese lunar orbiter
-Not one, but two fun moon activities you can try at home
Stay tuned!
Subscribe to:
Posts (Atom)