I'm posting to tell you that dreams really do come true. In 2004, I attended a lecture given by a friend who shared his experience travelling across the globe to see a total solar eclipse with his family, including 2 young children. At the end of his lecture, he strongly encouraged everyone to see a total solar eclipse sometime in their lives. Then he showed a map of all the total solar eclipses for the next 20 years. When I saw there would be an eclipse in Australia near the Great Barrier Reef in 2012, I knew I had found it. Hubbystronomer is a dedicated SCUBA diver and a love of all things marine. So I went home that night and pitched the idea. It was not a hard sell.
We came up with a plan. We started saving just a bit every month. $20 was all we could manage in those days; he was still in school, I had barely started working at my "real" job. But we had 8 years to make it happen. We started spreading the word to our family and friends, inviting them to also start planning and saving. As the years went by, we kept saving and planning and looking forward to November 2012.
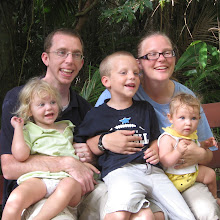
Well, my friends, the day finally came. And we were ready. By then, the total number of our group had increased to 7. Of course Hubbystronomer and I were in; Little Dudestronomer was 5, Rarastronomer was 2 and half, and Babystronomer was 7 months old. My parents also came along.
That's right, I'm 100% mom and -stronomer. We packed more luggage than you would believe, schlepped it and our family across the world, and saw the moon eclipse the sun while sitting on the beach overlooking the Coral Sea. It was incredible. Everything I had hoped for. An experience we will truly never forget. We also snorkeled on the Great Barrier Reef, fed kangaroos, watched crocodiles attack, threw shrimp on the barbie, walked on amazing and exotic beaches in the South Pacific, and a few other amazing things I don't have time to share with you right now.
The moral of the story is: you can do it! You can create opportunities to share astronomy as a family, whether it's finding Jupiter in tonight's night sky or travelling across two continents to see a total solar eclipse. Get an idea, make a plan and don't let anything stop you.
In case you're in need of an idea and don't mind being taken for a momstronomer copycat, there will be a total solar eclipse here in the US in 2017. What are you waiting for? Start planning, people!


